Optimize Like a Pro: Top Autoptimize Settings Revealed
Estimated reading time: 9 minutes
Last updated on May 24th, 2024 at 07:22 am
There are a lot of optimization plugins available for WordPress users but Autoptimize is one the best to minify Java, CSS, and HTML.
I have used and compared it with other plugins, but the page performance result comes in the favour of Autoptimize.
Autoptimize is like a speed wizard. It shrinks the big and heavy parts of your website, making it load faster.
Faster websites make people happy, and Google loves them too.
In fact, for every second your site takes to load, you can lose 7% of your audience. Autoptimize can help you avoid that!
Let’s start,
Maximize Your Website’s Potential with These Autoptimize Settings
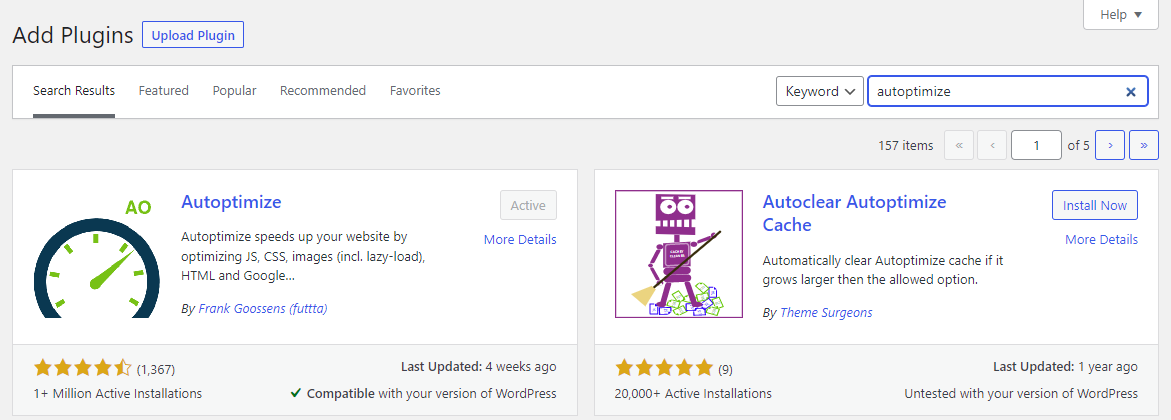
1. Install and Activate
Go to plugins-Add new-Search Autoptimize-Install-Activate.
You can find the Autoptimize plugin in the settings section at the left.
Look at the picture below for a better understanding.
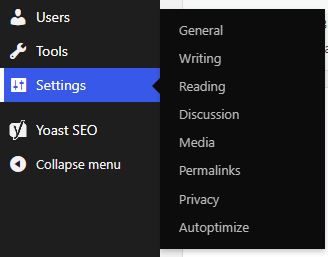
Click on Autoptimize.
2. JS, CSS & HTML Settings
Javascript Options

Optimize Javascript Code? – Enable
It is recommended to enable it as this can minify your JS codes.
Aggregate JS files? – Enable
Enabling this can resolve your render-blocking errors in page speed tools.
Also aggregate inline JS? – Disable
Let Autoptimize also extract JS from the HTML.
This can improve my page performance but the reason I cannot enable this is that it stops my popup from displaying.
The plugin author also recommends disabling this option as this can quickly grow your cache size.
If Enabled, make sure to check nothing breaks on your site.
Force JavaScript in <head>? – Disable
Not recommended as this makes the JS render-blocking.
Add try-catch wrapping? – Disable
This is not recommended but if you find any JS error or script break anywhere on the site then enable this.
Do not aggregate but differ? – Disable
This option is not available as I already enabled aggregate JS files earlier.
If you enable this option then individual JS files will be minified and deferred.
Exclude scripts from Autoptimize – Leave as it is.
Here you can add JS scripts you don’t want to minify separated by a comma.
“Note: Do not paste the JS codes here. You can only add files/folder names like wp-includes/etc.”
However, the excluded non-minified files are still minified by Autoptimize unless that option under “misc” is disabled.
Remove unused Javascript?
According to Autoptimize, it combines your theme and plugins’ JavaScript but does not know what is used and what is not.
If Google Pagespeed Insights detects unused JavaScript, consider using a plugin like “Plugin Organizer” or similar to manage what JavaScript is added and where.
Not recommended.
CSS Options
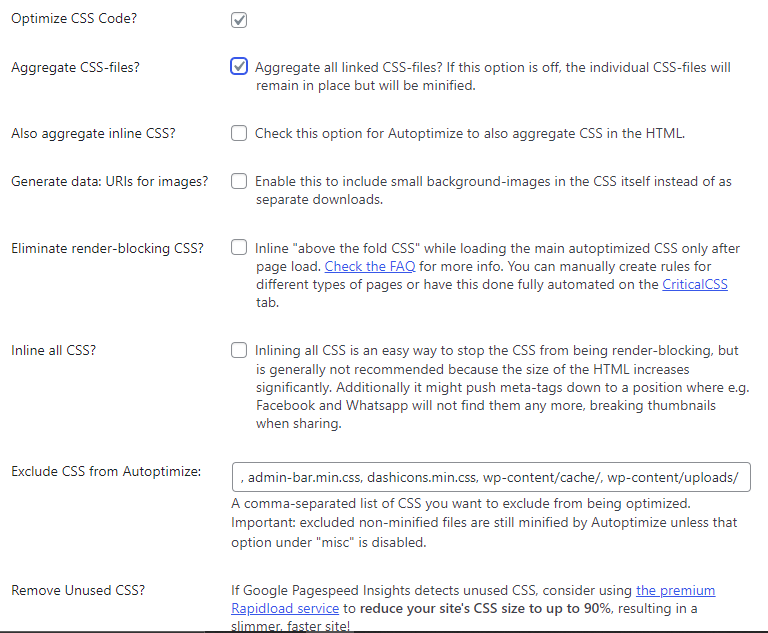
Optimize CSS code – Enable
It is recommended to enable this to minify your CSS codes.
Aggregate CSS files – Enable
If this option is off, the individual CSS files will remain in place but will be minified.
Also aggregate Inline CSS – Disable
Check this option for Autoptimize to also aggregate CSS in the HTML.
Not recommended as this can also increase your cache size quickly and sometimes break your site.
Generate data: URLs for images – Disable
Enable this to include small background images in the CSS itself instead of as separate downloads.
Eliminate render-blocking CSS? – Disable
Enable to Inline “above the fold CSS” while loading the main autoptimised CSS only after page load.
Not recommended.
Inline all CSS – Disable
Inlining all CSS is an easy way to stop the CSS from being render-blocking, but is generally not recommended because the size of the HTML increases significantly.
Additionally, it might push meta-tags down to a position.
For exam – Facebook and WhatsApp will not find them anymore, breaking thumbnails when sharing.
Exclude CSS from Autoptimize – Leave as it is
Here you can add CSS files that you don’t want to minify.
“Note: Do not paste the CSS codes here. You can only add files/folders names like wp-content/etc.”
However, the excluded non-minified files are still minified by Autoptimize unless that option under “misc” is disabled.
Remove unused CSS?
According to Autoptimize, if Google Pagespeed Insights detects unused CSS, consider using premium rapid load service to reduce your site’s CSS size to up to 90%, resulting in a slimmer, faster site!
Not recommended.
HTML Options
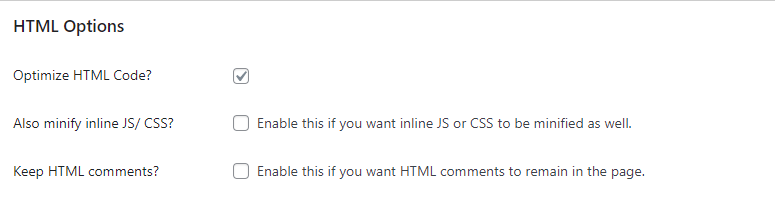
Optimize HTML code – Enable
This is recommended to minify your HTML codes.
Also minify inline JS/CSS – Enable
Make sure to check if nothing breaks after enabling this option.
Keep HTML comments – Enable
Enable this if you want HTML comments to remain on the page.
Disable if your comments are not moderated and approved automatically.
My comments are approved manually, so there is no issue enabling this option.
CDN Options
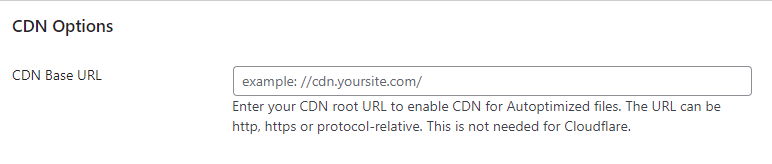
CDN base URL – Leave this blank if you are using Cloudflare, otherwise enter your CDN root URL to enable CDN for autoptimized files.
Cache Info

This is the information section. You can’t change or edit options directly from here.
Cache folder – root location of your autoptimize cache folder.
Can we write – permission to write (make sure it is yes).
Cached styles and scripts – total no. of cached files.
Misc Options
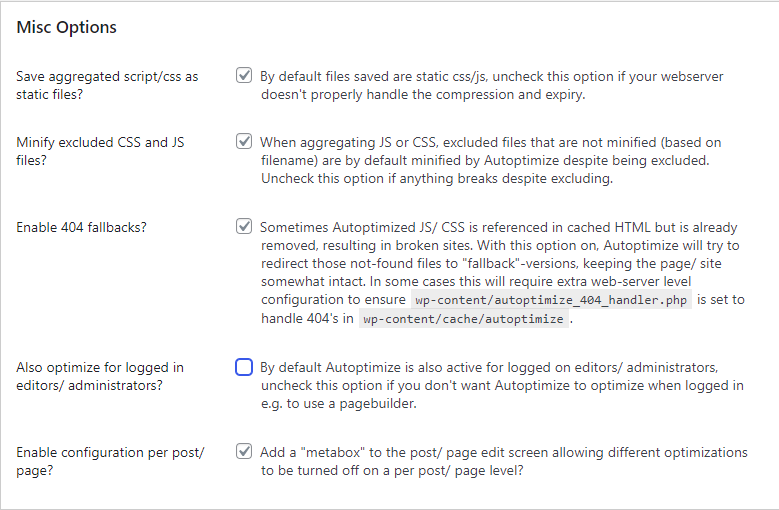
Save aggregated script/CSS as static files? – Enable
By default files saved are static CSS/JS, disable this option if your web server doesn’t properly handle the compression and expiry.
Minify excluded CSS & JS files? – Enable
When aggregating JS or CSS, excluded files that are not minified (based on filename) are, by default, minified by Autoptimize, despite being excluded.
Uncheck this option if anything breaks, despite excluding it.
Enable 404 fallbacks? – Enable
Sometimes Autoptimized JS/CSS is referenced in cached HTML but is already removed, resulting in broken sites.
With this option on, Autoptimize will try to redirect those not-found files to “fallback” versions, keeping the page/site somewhat intact.
In some cases, this will require extra web server level configuration to ensure wp-content/autoptimize_404_handler.php is set to handle 404s in wp-content/cache/autoptimize.
Also, optimize for logged-in editors/administrators. – Disable
Disable this option if you are using a page builder.
Or you have to purge the cache every time to check the changes you make to your site.
Enable configuration per post/page? – Enable
Enable this if you want to add a “meta box” to the post/ page edit screen allowing different optimizations to be turned off on a per post/ page level.
This helps when you want to clear the cache of a separate page or post after changes.
Next is to save changes and empty the cache.
3. Images Settings

Optimize images – Disable
Enable this if you want to serve your images from ShortPixel’s global CDN including next-generation WebP image formats.
Shortpixel is a premium service where you can optimize only 200 images per month for free. After that, you have to pay.
![]()
If you are not using enough images then connect with shortpixels.
I disable this because my theme already supports and converts the images into WebP format.
Themify Ultra theme has a lot of features that you can’t imagine.
That’s a different topic to discuss here, so you can check the review article of the Ultra theme later when the Autoptimize settings are done.
Lazy Load images – Enable
Image lazy loading will delay the loading of non-visible images to allow the browser to optimally load all resources for the “above the fold” page first.
This option is very important and recommended. A lazy load reduces extra requests from loading.
Lazy Load exclusions – Leave as it is
Here you can add image filenames to exclude them from lazy loading.
Lazy-load from nth image – set to 2
1 means lazyloading all images.
2 means lazyloading after 2nd image.
3 means lazyloading after 3rd image and so on.
Click save changes.
4. Critical CSS Settings
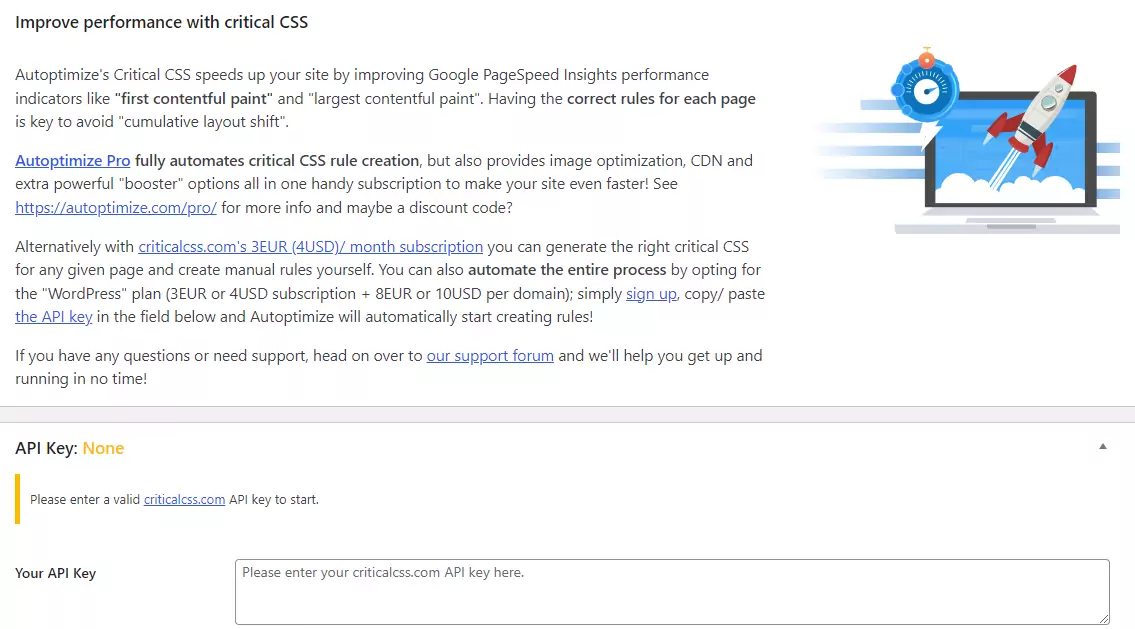
This is a premium service by the Autoptimize plugin where you can solve issues related to render-blocking CSS and first paint times.
According to Autoptimize, Above the fold CSS (as part of Autoptimize’s “inline & defer CSS”) can help you improve, but most sites need different critical CSS for different types of pages and generating the correct code can be hard!
However, I do not recommend this as you can solve this issue using Cloudflare Settings.
5. Extra Settings
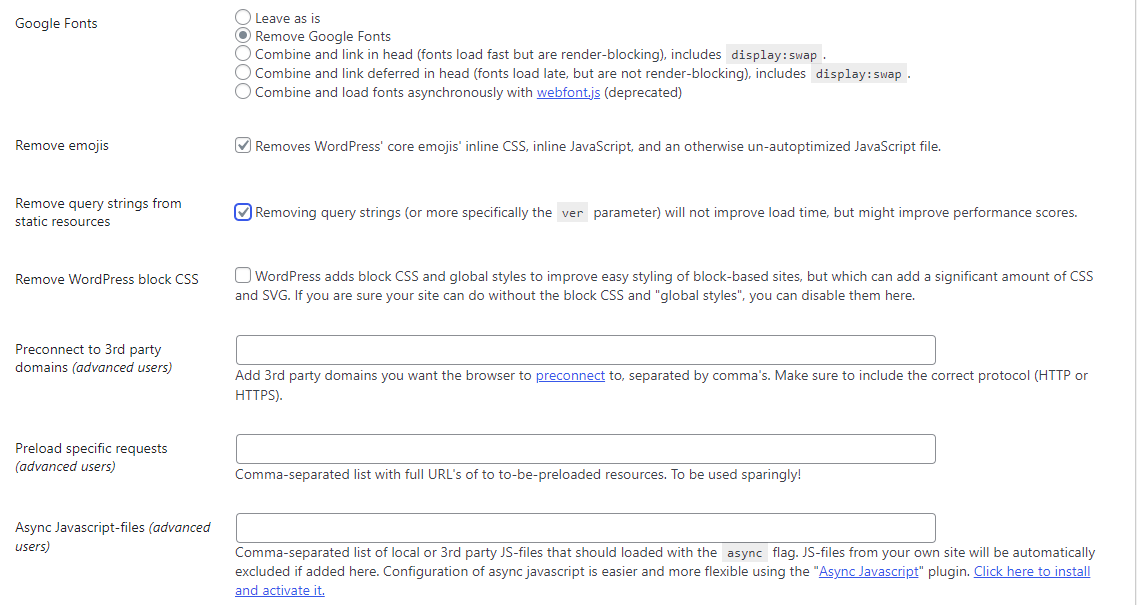
Google fonts – Remove Google fonts
As it impacts your page load time or if you want Google fonts then enable “combine and link in the head”.
Remove emojis – Enable
Removes WordPress’ core emojis’ inline CSS, inline JavaScript, and un-autoptimized JavaScript files.
Remove query strings from static resources – Enable
Removing query strings will not improve load time, but might improve performance scores.
Make sure to check your website after this setting as this can break your site. For example – one of my site’s mobile menus stopped working.
Remove WordPress Block CSS – Enable
WordPress adds block CSS and global styles to improve the easy styling of block-based sites, but it can add a significant amount of CSS and SVG.
If you are sure your site can do without the block CSS and “global styles”, you can disable them here.
Preconnect to 3rd party domains (advanced users) – Leave blank
Add 3rd party domains you want the browser to preconnect to, separated by commas.
Make sure to include the correct protocol (HTTP or HTTPS).
Preload specific requests (advanced users) – Leave blank
Here you can add a Comma-separated list of full URLs to preload requests.
Async JavaScript files (advanced users) – Leave blank
Comma-separated list of local or 3rd party JS files that should be loaded with the “async” flag.
JS files from your own site will be automatically excluded if added here.
Optimize Youtube videos – Autoptimizes recommended plugin to optimize your YouTube videos – Wp Youtube Lyte Plugin
However, I think Lazy load by WP-Rocket works better.
Click save changes.
6. Optimize More
These are the premium plugins, themes, and CDN for better optimization.
I don’t recommend any of these.
For the best performance of a website, you only need a fast & reliable host, a well-coded theme, CDN configuration, and some basic knowledge of other things like how minification works, how to optimize the database, etc.
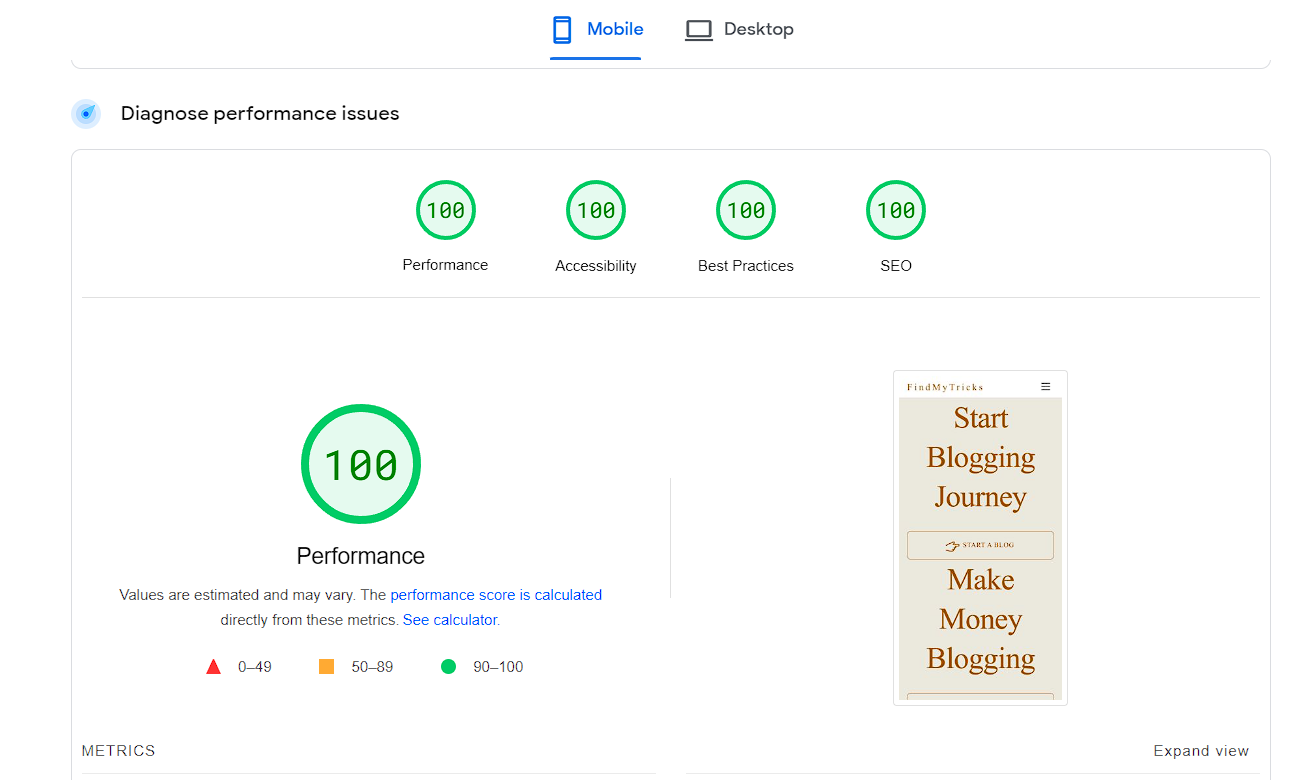
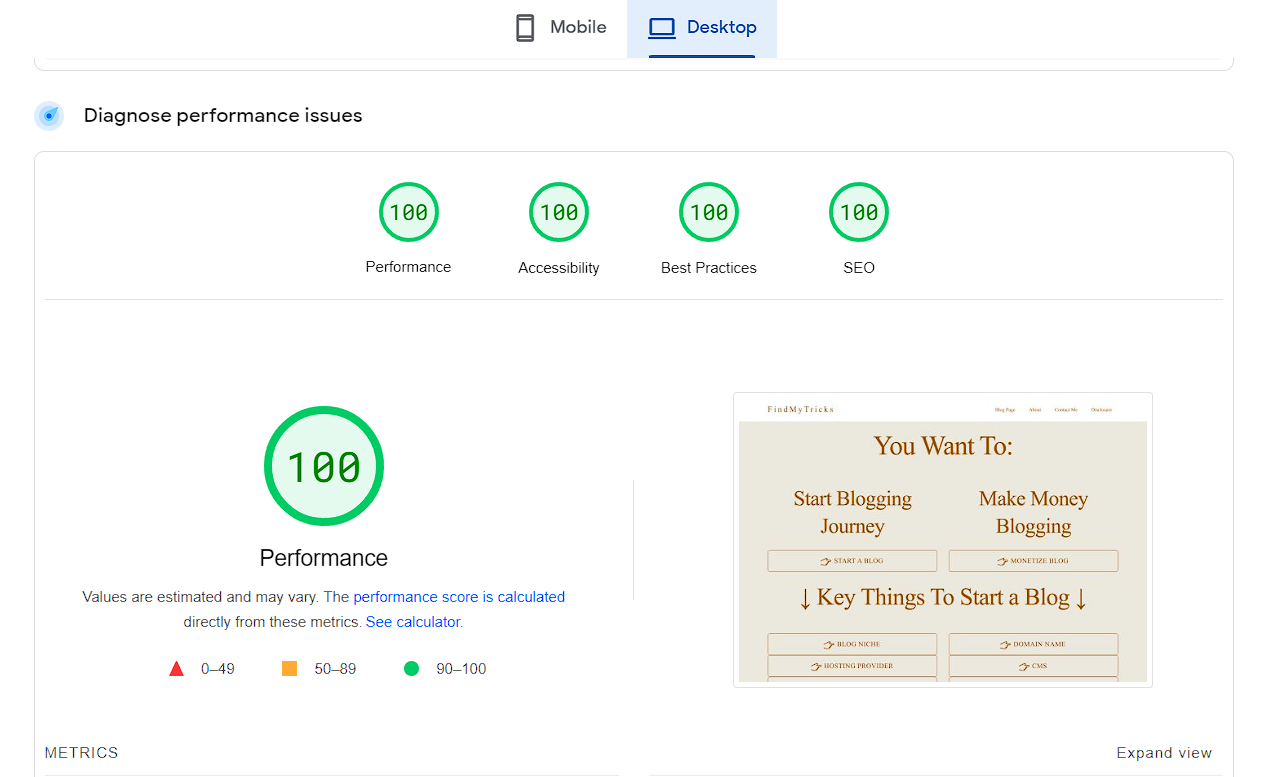
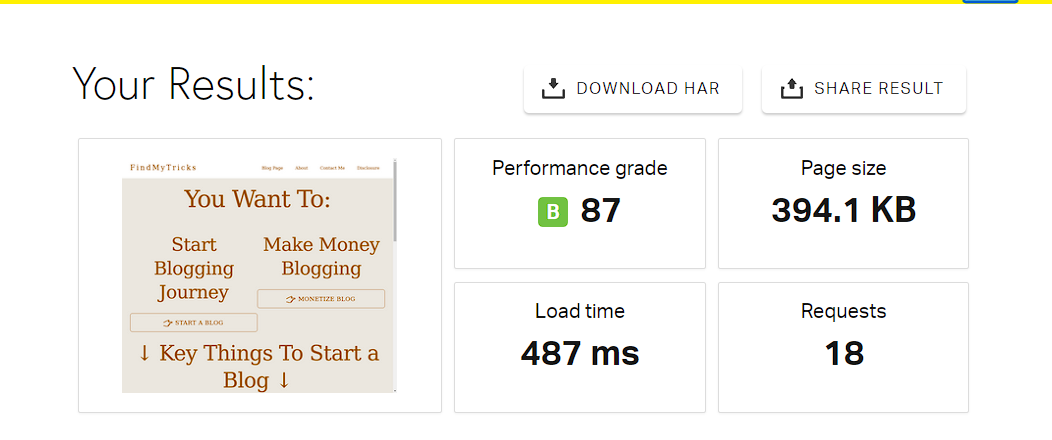
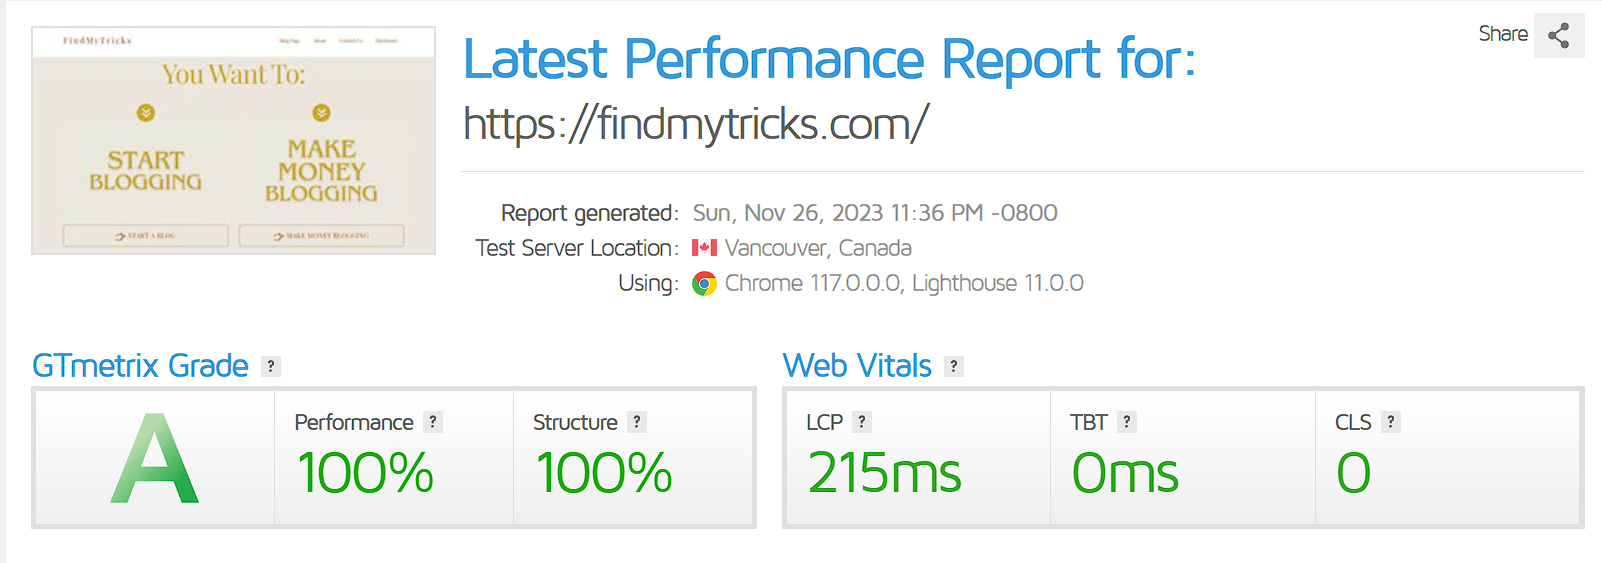
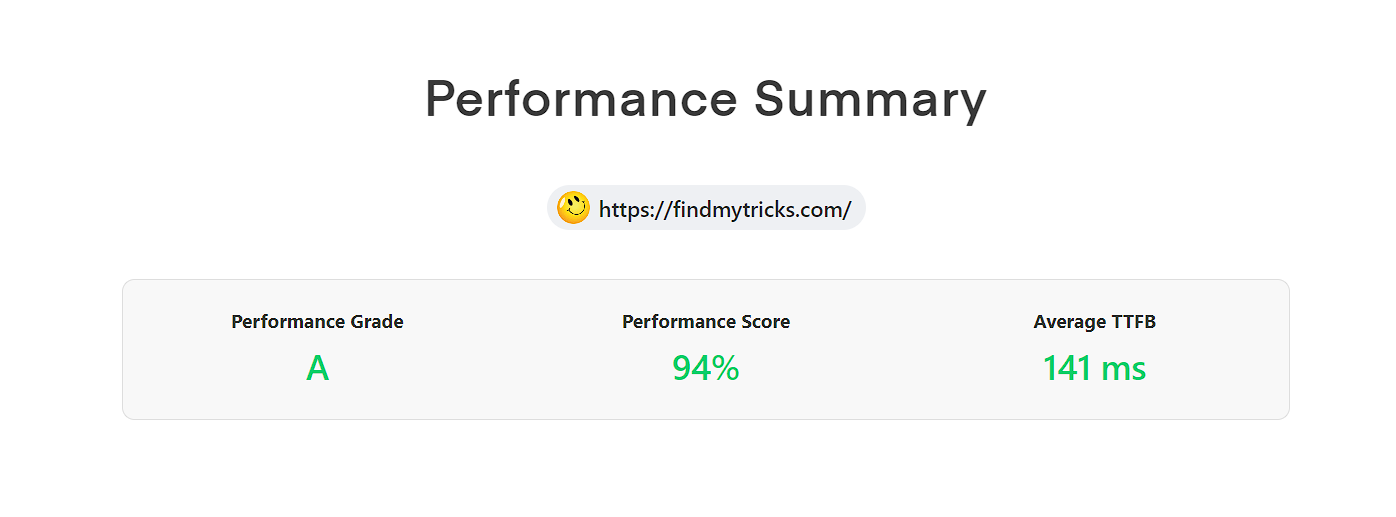
My Performance Scores
These are my results in Google Pagespeed Insights and Gtmetrix.
My Setup Includes = Cloudflare CDN + Cloudways Host + Themify Ultra Theme + Super Page Cache Plugin
Wrapping Up
So, these are the best settings and of course, tested settings from my side for better performance.
Follow these settings and compare your results.
BTW for best results, I recommend using my Setup.
victoria
November 21, 2023 @ 3:47 pm
Thank you Ajmer, this was helpful
Ajmer Singh
November 21, 2023 @ 6:58 pm
I am glad it helps.
Stephen Thiam
November 19, 2023 @ 10:07 pm
Thank you for your good recommendation. I follow all your settings including disable the image optimization because all images on my website are lighter below 35KB. Just not sure this result is it sustainable?
Ajmer Singh
November 20, 2023 @ 12:34 pm
Image optimization is not needed if your images are below 100 kb. Just make sure to convert them to WebP format and use Lazy Loading (My theme supports both).
For best results, I recommend using my Setup.
Tad Craig
March 22, 2023 @ 2:52 am
Greetings from Maui Hawaii. I’m a one man show w very small budget treading water in a sea of sharks who are constantly trying to get jobs that I need.
I need help please. My GT scores are only B’s or worse & I cant seam to find the best settings that propel my website to the first page
Any help you can do would be so appreciative.
Mahalo TadCraigPhotography
Ajmer Singh
March 24, 2023 @ 10:38 am
To get a good score in Gtmetrix or Pagespeed Insights follow this article:
https://findmytricks.com/how-to-get-a-100-score-in-gtmetrix/
Arjun
March 21, 2023 @ 11:25 am
Does any of these settings impact Adsense ads and earnings?
Ajmer Singh
March 21, 2023 @ 2:52 pm
No, these settings will only improve your adsense earnings and performance.
Fast loading website is necessary if you are using adsense or any other ads on your website.